6.30.2008

Polka Dots & Daisies

This cake was for a 75 year old birthday girl. I can't believe I actually took on this cake, really. I was SO exhausted from the wedding. But alas, I had already commited to it. What was really nice, and made things easy, was that the lady who ordered it wanted the same flavors I had just done for the wedding: marble cake with dark chocolate ganache filling. But this time, I did buttercream icing and only used fondant as decorations.

This was a nice, quick, and fairly easy cake. I baked a few days in advance, and prepped the icing as well. So the night before delivery all I had to do was put it together. Before I started on it that night, I made a quick trip to pick up some flowers for the cake and found the most beautiful hot pink Gerbera Daisies. I actually didn't realize how big they were until I took off the wrap that was around each flower. Turns out... I bought WAY too many. But oh well, the rest were a nice boquet on my dining room table. :) Apparently, at the party, a few of the guests didn't think the flowers were real! They were certainly perfect enough to look fake!

Here's the final cake! The polka dots and stripes are made out of fondant, as well as the "75" on top. The rest is all buttercream.

6.27.2008

Black & White Wedding Mini Cakes

What an amazingly, exhausting experience.

I mean, I knew it was going to be a lot of work, but I had NO IDEA what I was getting myself in to.
The bride wanted to have 150 mini cakes with a black and white design to fit their color scheme. We decided on marble cake with a dark chocolate ganache filling and fondant icing. The cakes would be wrapped in black satin wribbon around the bottom edge and have 2 edible (alternating) black or red royal icing hearts sticking out the top.

My first task was to build the stand that all of the cakes would sit on. I constructed it out of Foam core board and styrofoam. I cut the Foam core into 6 graduating squares, then glued a pretty wedding wrapping paper to the top and bottom of them. Around the edges I glued black ribbon. I purchased the styrofoam as one big sheet that was 2" thick, 12" wide, and 36" long. Then I cut it down in to 2x6x6" squares and stacked and glued three squares together to form 6 inch blocks. If you look closely at the picture below you can see the styrofoam squares before I wrapped them in the wrapping paper (aside from the top one).


Once the blocks were glued and wrapped, I glued black ribbon around the top and bottom edges to finish off the look. Below is what the final stand would look like. However, at this point all of the layers were not glued together, they were simply stacked on top of eachother. It wasn't until the night before that I actually glued it all together.


By the Wednesday night before I had as much ready to go as I could, but I knew I still wasn't going to get it all done unless I took some time off work. So I took off a half day on Thursday and all day on Friday. I immediately went to work as soon as I got home on Thursday night and worked on it until about 11:30ish. Then got back up at 8am Friday morning and worked on it ALL day up until I had a meeting to go at 7pm. By the time I left for the meeting I had 22 cakes done.. 22!! (now, remember ... I was supposed to have 150 done for the wedding the next morning??). At that point I was already so exhausted, and the daunting task I had ahead of me (and how little I currently had done) began to overwhelm me. Even to the point where when I got to the meeting someone (totally joking) asked me, "Are you done with that cake yet?!"... and I about burst in to tears. But praise GOD for my dear, sweet, unbelieveable friend Kelly who came to my rescue and offered to come over and help me. I didn't get back home until about 9:30 and Kel got there I think about 10:30. From that point on we worked.. and worked.. and worked. When Michael got home about 2:30AM he started to help too. Yes folks.. that's 2:30am... (he was IN the wedding so he had been at the rehearsal/rehearsal dinner all night which is the reason I ended up being the one to go to the meeting). The most trouble we had was with the fondant. It is SOO tempermental. You can't have it too warm, too cold, too greasy, too sugary, etc., etc.... And it was a very time consuming process just to get ONE cake covered. See, I had the cakes (all filled, cut in to squares, and ready to be covered) in the freezer because they are much easier to work with when frozen. But then the cake had to have a "not too thin-not too thick" layer of buttercream put on so that the fondant would stick. Then the fondant had to be rolled out (but not too soon otherwise it would dry out) and cut to the approximate size for the cake. Then the cake had to be carefully covered making sure not to pull too hard in one direction otherwise it would tear - oh, and making sure you get the corners perfect so there's no pleats.. etc., etc..... blah, blah, blah. Basically it was A LOT of time consuming work. Way too much for one person to do, so I totally thank God for Kelly and Michael's help.

I think it was about 3:30am when I began walking around like a zombie and my eyes began to glaze over when Kelly said we ought to take a break. So she left and I stayed up another half hour or so to finish some stuff up then went to bed. At 7am I was back up (yes, 3 hours later) and Kelly (bless her heart) came back at about 8. At that point panic began to set in as the wedding was supposed to start at 2pm in San Francisco. Well Michael was starting to panic too since he was in the wedding and needed to be at the chapel by 1pm. So he was freaking me out, I was freaking him out, and Kelly found a way to solve the problem. :) We finally decided that we were just going to have to drive separate. So Michael got ready and left and I decided that the latest I could possibly leave was 1:00 in order to get there in time to set it all up. I knew at that point that there was NO WAY I was going to make it to the ceremony. We figured we'd get as far as we could on the cakes and that would be that, no matter how much we had gotten done. By 12:30 we had 100 cakes done and I ran in to the shower while Kelly finished up putting the ribbons on the cakes. By 1:00 I was out of the house with cakes in hand and on my way to SF. I got to the reception hall by 2:00 and no joke it was like 1000 degrees in there! I couldn't believe how hot it was and began to worry that the cakes just might melt! I quickly got the cakes put on the stand and began pushing in the royal icing hearts. First the black, then the red - wait, the red aren't dry!! Eek! Luckily I had piped out just enough black hearts to use in place of the red. (I piped extra incase of breakage). Turns out, not all of the 100 cakes we had done even fit on the stand, so I kept the remainder in the box. At 3:00 the cake was done. Phew! So I rushed to the restroom to put on my make up, do my hair, and get dressed. (it was a pretty scary sight when I finally first looked in the mirror! haha) And at long last, by 3:30, I was done.
The guests started showing up about 4:00. Praise God that it was all done in time. I hit A LOT of snags along the way, but in the end everyone really liked it and it turns out there was plenty of cake to feed everyone. There was even some left over for the bride and groom to take home. Whew! It was the most exhausting and labor-intensive cake I've ever done, but it was totally worth it to see the look on people's faces as they walked by.

Well... here it is! (Better pictures to come soon, I promise)


6.17.2008

Rosettes and Bows

A friend of mine was having a birthday party and wanted to me to make her cake. :) She wanted it to be chocolate, chocolate, chocolate! So we decided to do a two tiered cake. The top 6" cake would be just for her... a chocolate cake with rich chocolate filling and icing. The bottom 9" cake would be marble, but also have the chocolate filling and icing. Yum!

My only struggle was when it came to actually coming up with a design for the cake. I swear I had "designers block" .. (get it? Like writer's block??) ;) Anyhoo, I struggled to come up with a design I liked until the day before I had to make it. I think I was having so much trouble because of the colors I was trying to work with. Her favorite colors are orange and turquoise-y blue. And trying to combine that color scheme with chocolate icing was a bit of struggle for me. I eventually decided on doing orange rosettes and blue ribbons & bows out of fondant. Below is a picture taken while I was working on the rosettes. They are actually pretty easy to make, just a little time consuming. The fondant is rolled out very thin, and then cut in to approximately 1.5" x .5" strips. Then you just roll them up and trim off the bottom edge to make it flat. Once they dry, you can attach them to the cake with a little icing.


I colored some buttercream icing green to make the leaves. I also used this to attach the rosettes to the cake. When it came time to wrap the blue fondant ribbon around the bottoms of the cakes, I had a little trouble getting it on the cake without marring the surface. I guess I didn't realize how hard fondant is to control in long, large strips. But once I got it around, I made sure it was secure and then attached the bows. A few white dots, and "happy birthday" on the top, and it was good to go! It sat in the fridge overnight and was ready for her fiance to pick up the next evening.

No word yet on how the cake went over with her or the guests (I wasn't able to make it to the party), but I really hope she enjoyed the design and the taste.

Happy Birthday Christina!

6.06.2008

Reach for the Stars!

My youngest sister graduated just from high school last weekend. Eek! Well her ambition in life is to be an actress. Theater.. movies..TV... who knows? At this point she can do anything. So with that in mind, the theme for her graduation party was "Reach for the Stars".

For her cake I decided to try something new (big shocker, eh?) and go with a topsy-turvy design. The colors of the party were gold, silver and black. Here's my original design:


She also wanted to have two different flavors of cake and filling in order to accomodate everyone's tastes. So the bottom layer was white cake with strawberry filling, and the middle and top tier were chocolate cake with vanilla custard filling. Because each cake was going to be cut at an angle, I decided to do 3 layers of cake and 2 layers of filling per cake, instead of my usual 2:1 ratio. Baking and filling prep came along nicely. I had a bit of trouble though when I started cutting in to the cakes. I realized I really should have made them a bit taller, but that's a lesson learned for next time ;) Once they were all angled and stacked, I assembled them and put a crumb coat layer of icing on. Here's the cake with the crumb coat before a trip to the fridge to set:


After that had set I iced the cakes. Now... remember the gold and silver colors? Yeah, not exactly easy to make those colors out of buttercream icing and fondant. So you'll see what I ended up with.

OH! And my new favorite gadget: the icer tip! It's awesome. It's a tip with a huge wide flat opening so that you can actually pipe the icing on to the cake instead of having to keep spooning it out of a bowl. Talk about a time-saver! Plus it gives you a nice even thickness all the way around the cake. Love it!

Here's what the cake looked like once I put the icing on:


The process up until this point had gone fairly smooth. Actually, it all pretty much went better than I thought. I really only had issues once I stared dealing with the fondant. At first I didn't think I was going to have enough, so I tried to make another batch, but it didn't come out right. BIG waste of time. After that it just became more time consuming than anything else. I had to color all the fondant, get all the shapes cut out, and get them on the cake. I ended up changing the design a little because the silver fondant that was supposed to go on the top wasn't really working with me. But I think it still turned out nice. Here are some final pictures of the cake at the party:


5.22.2008

Jillian's Horse Cake

Original phone message left on my voicemail by 6 year old Jillian:
"Hi Tara, umm.. so... for my cake I want an ice skating rink with princesses on it." :)

Jillian was having her 6th birthday party in April at the ice skating rink in Dublin. And, naturally, being the princess that she is, wanted an "ice skating rink with princesses on it" cake. So I had come up with a few design ideas for the cake and started prepping for it. But then, about a week before the party, she decided that she instead wanted a cake with horses on it and a pasture. Soooo.... my original plans went out the window and I scrambled to come up with a new design. I played around with some new ideas and was able to find some cute horses at a local party supply store. So the horse cake was under way! Her request was also to have strawberry cake and vanilla filling. I decided on a two layer strawberry cake with just a plain ol' box of vanilla pudding as the filling. It actually turned out quite well! And being that her favorite color is pink, she loved it when we cut the cake and saw that it was pink inside!

The cake went together pretty easy. I did have some issues with the drop flowers. They didn't quite turn out as planned, but I think it still came out pretty nice. The other thing I had a concern about was getting the horses to stand up on the cake. They were basically made out of styrofoam and didnt weigh very much. I was afraid that they would just end up falling over and ruining the cake. But Michael had the genious idea of poking toothpics through the bottom of their hooves and then sticking them in the cake. And IT WORKED! I was really glad too. Plus, she got to keep the horses after we took them off of the cake. All the other little girls there were asking me if they could have the horses after we cut the cake and I told them they had to ask Jillian. She, of course, told them no. Haha.
The picture below is the only one I have of it so far. Taken with my cell phone, so not all that great, but better than nothing!

4.16.2008

A's Baseball

Happy 9th birthday to my sweet baby brother, Ryan. It's amazing how quickly time flies. Hard to believe he's 9 already, but I guess that's just how it goes.

For his birthday party he decided to do a baseball theme. He is currently in little league, and this year his team is the A's. So, naturally, an A's baseball cake would fit the bill! I sent over a few rough sketches for him to pick through, and he ended up liking the one below the best. (I'm glad too because that was also my favorite!) :)


He decided (with a little help from my parents) on chocolate cake with a vanilla custard filling and buttercream icing. It was my first attempt at custard, and I'm pretty happy with the results! It definitely tasted better than a plain ol' box of pudding, but it certainly was a lot more work. But alas, he is always worth the extra effort. I also decided to try something else new for this cake. I've been playing around with royal icing before and really wanted to actually USE it on a cake. So being that it was my first attempt, I just decided to stick with something small, which in this case was his name, so that if anything went wrong it wouldn't be that big of a deal. I piped it out in a couple of different colors on to a cookie sheet the day before so that they would have enough time to harden. And the extra letters were to have as a backup in case I had any breakage issues (which I did in the end. When I went to put the letters in to the cake at the party, the green "N" broke, so I ended up alternating colors in order to make it work.)


The cake and icing all came together smooth. I just find it really time consuming and right now I've only got so many hours in the day that I can devote to cakes. I had to juggle and rearrange some things in order to carve out enough time to get it all done. And so by Friday night at about 10pm I had the cakes leveled and ready to be put together, and all the icing coloring done.


The picture on the right is all the different colors I had to mix for the cake. (The pyrex bowl in the background is the custard filling). It's really amazing how long it takes just to color icing. Not to mention the huge mess it makes! I always start with a clean kitchen before I start coloring my icing, and it still always ends up a mess. I try to clean as I go, but it never fails; my kitchen is always a disaster zone by the time the cake is completely done.

Anyhoo...I did have a few issues with the initial crumb coat. I think I may have made it a little too runny so it wasn't really "crusting" well. So when I went to put on the chocolate buttercream around the sides, it just didn't want to stick and kept sliding down the cake. But after a bit of fiddling with it (and praying), I was able to succesfully get it iced and decorated. Below is my "midnight update" picture that I sent to my mom. At that point I had most of it done; just needed to finish up the details.


After that, I started working on the mini baseballs that were supposed to go around the bottom of the cake. But because I was having issues getting the "stitching" on the balls to look right, I decided to nix that idea and go with something a lot simpler. I also decided not to do the baseball bats around the sides because I was simply running out of time and, more importantly, energy.

*As a side note: I was SUPER excited to use the new turn table that my grandma had bought me for Christmas! You can't really see it in the picture above because the cake board was covering it. But wow... it really made things a lot easier, especially since a 14 in round cake isn't really all that easy to move around while trying to decorate. With the turn table I was able to swivel it around as I pleased and it made it SOO much easier to work with. Thanks Grandma!!*

By 1:30am I was done with the cake. I'm pretty happy with the way it turned out. I was especially pleased with the hat. The A's logo was done completely freehand. I was originally going to do a frozen buttercream transfer, but just decided to freehand it to save time. Also, the hat and baseball were made completely out of cake. Actually, the ball was a cupcake! And it was all decorated in buttercream icing, all the way down to the brim of the hat.

The pictures below aren't the final pictures of the cake. These are just ones I was able to snap before I left for the party. Once I got there I put the letters of his name on the baseball (refer to the sketch). But at this point I haven't gotten any of the pictures from the party yet. But when I do I'll be sure to post them.


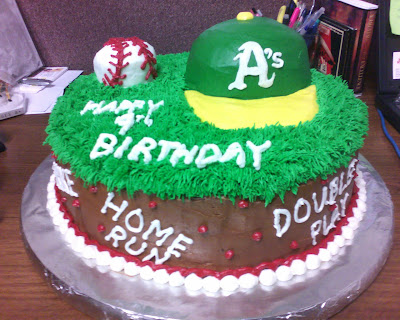
When I showed up at the party everyone seemed really surprised and impressed. I think Ryan really liked the cake, and so did the other kids. Some of the kids even thought there was real grass on it! Haha. I did get some great feedback on the cake from the other parents that were there about the taste and looks . It's always good to know people enjoy the actual taste of the cake and not just the way it looks!

3.24.2008

Cheetah Girls

This cake was actually made this past November, but I've just recently recieved the pictures from the event. The cake was for my friend's little girl's year-end soccer party. It was just a simple chocolate cake with buttercream filling and icing. The soccer ball on top was also done with cake. The bottom cake had purple "cheetah" spots and each of the girls' name written around the cake.


The party was held at SuperFranks in Pleasanton. (Something similar to a Chuck E. Cheese environment... lots of kids running around all hopped up on massive amounts of pizza, soda and candy.) So it was interesting carrying the cake ALL the way to the back. I had to have my friend help me clear a path so I could get to the table quickly, trying to dodge lots of kids and parents as we went along. Not many people realize how heavy a cake becomes once its got lots of filling and icing on it. My arms were getting pretty weak as we made our way back. But whew! I made it!


The girls seemed to really like the cake; especially the fact that their very own names were on it. I think that really added a nice personal touch. So the kids ran around for a few hours and by the time they were ready to cut the cake it was just about time to leave. So we ended up cutting out each chunk of cake that had the girl's name on it and they were able to take it home and share with their family.

10.01.2007

Flying Phoebe

Definitely the most non-rushed, relaxed cake I've ever done...but I suppose that's also just the benefit of getting it done the night before. :) We figured since the cake was for a party at 4:00 on a Thursday, that it would be best to finish it up the night before so we wouldn't have to scramble the day of. Which, by the way, makes it SOO much easier. This was probably the most fun I've had making a cake so far. By doing it on Wednesday night we were able to just relax and and have a good time. Of course, Kelly did all the hard work on the days leading up to that. She already had the cakes baked and icing prepared, so all I had to do was come over and help put it all together! Woo-hoo!

We had her son take a few pictures of us while we were "in the process". I always have the intention of taking pictures in progress, but am usually rushing around and never get a chance to. So it was great that he snapped a few for us. At this point Kelly was working on the fondant (all the bright colored strips and dots you see on the table) and I was finishing up icing the cakes and putting in the dowel rods. The rods act as a support for each layer so that when they're stacked up they don't sink down from the pressure. You can only actually see one of the layers in these pictures. The other ones were off to the side. And how about that make-shift cake stand, eh?? .. Ok...yes, it's an upside down pot.... one of these days I'll get a real turntable, but for now it works. :)


Once we finished that we were able to get the cakes stacked up and decorated. We ended up changing the design slightly. But, then again, my cakes never come out exactly as planned. It's always a matter of using a little improvisation. We ended up not using the diamond pattern for the middle layer because we were limited on the amount of fondant. (If you have no clue what I'm talking about, refer to my previous post.) So what we ended up doing instead was just making crazy strips to go around that layer. It turned out really cute too.


The other pictures below are of Kelly working on the cake topper. If you've read my previous post, the cake we were making was for her doll club called The Flying Phoebe's. So for the top of the cake she created the club's mascot (see the picture up top) out of gumpaste . The pictues below are of her painting it. You can see some flowers on the left. We were trying to paint those and incorporate them in to the cake, but it just didn't work right with the style... so we 86'd 'em!


Once we put it all together I think it turned out really great. Below is the final product (sans the actual topper):


The polka dots, stripes, and balls are all made out of fondant. The rest is buttercream icing, including the number 20. We also used the buttercream as a filling. Each tier of cake is actually a different flavor too! The bottom is butter yellow, the middle is lemon, and the top is white with confetti. (The lemon was definitely my favorite!)


Below, on the left, is us after a long night of decorating. If I remember right it was about 1am when I finally left her house. If you look above my head, taped to the cupboard is the sketch of the cake. Its always good to have it up where you can see it so you can refer to it while decorating. On the right is the picture of the cake at the actual party. You can see the Phoebe mascot on top. :)


9.13.2007

Sketches with Paint

So I thought I'd share a little bit about my process of coming up with a design for a cake. I generally just use the "Paint" program on my computer to come up with a few rough ideas of designs. This next cake I'm working on is actually for my friend Kelly's doll club. It's the 20th anniversary of the club. And it's acually her cake we're doing...I'm just helping her out on whatever she needs. :)

Originally we had planned to do a "mad hatter" style cake, but due to time constraints we decided just to go with a standard 3 tier cake, but with the same type of designs on it.... So you've never heard of a mad hatter cake?? Well basically its constructed to look like the cake tiers are all falling apart. Each layer is slanted at an angle to give it that effect. Below are some of my original sketches for the mad hatter design based on our original color scheme:


So, again, we decided not to do the mad hatter style and we also changed the color scheme a bit. And after I showed her some of the above designs, she decided on a basic pattern she liked and I ran with it from there. Below are the designs I came up with after that:


In the end, we combined a couple of the designs and came up with a final sketch of what the cake will look like. The diamonds and dots shown will be made out of fondant, but the rest of the icing will be done using buttercream. Here's the final sketch:


We'll be putting the cake together next week, as the anniversary party is Thursday, September 20th. If you're interested in learing about the doll club, just click on the following link: http://www.flyingphoebe.com/

Wish us luck!!